Course · Part 4 · Assignment 2
Read ![]()
The Graphic Design Process
KeyThree
The key points from this assignment.
- Observing a set process gives you a supporting structure when you begin a new project
- It also helps ensure you stay focused on the needs of the client and the design brief
- Follow our six-step process during this course, and use it to develop your own approach over time

Image credit: Digital Buggu
Introduction
Over time, every designer develops their own process — their own preferred set of steps between the initial design brief, and the final result.
In this lesson, we’re providing you with a simple six-step process that can be the starting point for your own process. In the first few years of your career, it will naturally evolve, as you experiment and customise the things you do at each stage.
Above all, remember: the right process is the one that delivers what the client needs. (And, ideally, one that helps the client understand that what they need isn’t always what they want — but more about that later.)
A client-centred graphic design process
The rest of this assignment details the graphic design process through six steps. We’ve called it “client-centred” because it is built around collaboration with the client through initial writing of the brief, client feedback, and design revisions.
In this process, the “client” is whoever has asked you to do the project — it could be your boss, another colleague, or someone who’s approached you to do some freelance work. The important thing is to recognise that every design project happens in conversation with other people. By staying client-centred, we can avoid the temptation to design in a vacuum or be driven too much by our own opinions or tastes.
Before we go through the process step by step, here’s an overview:
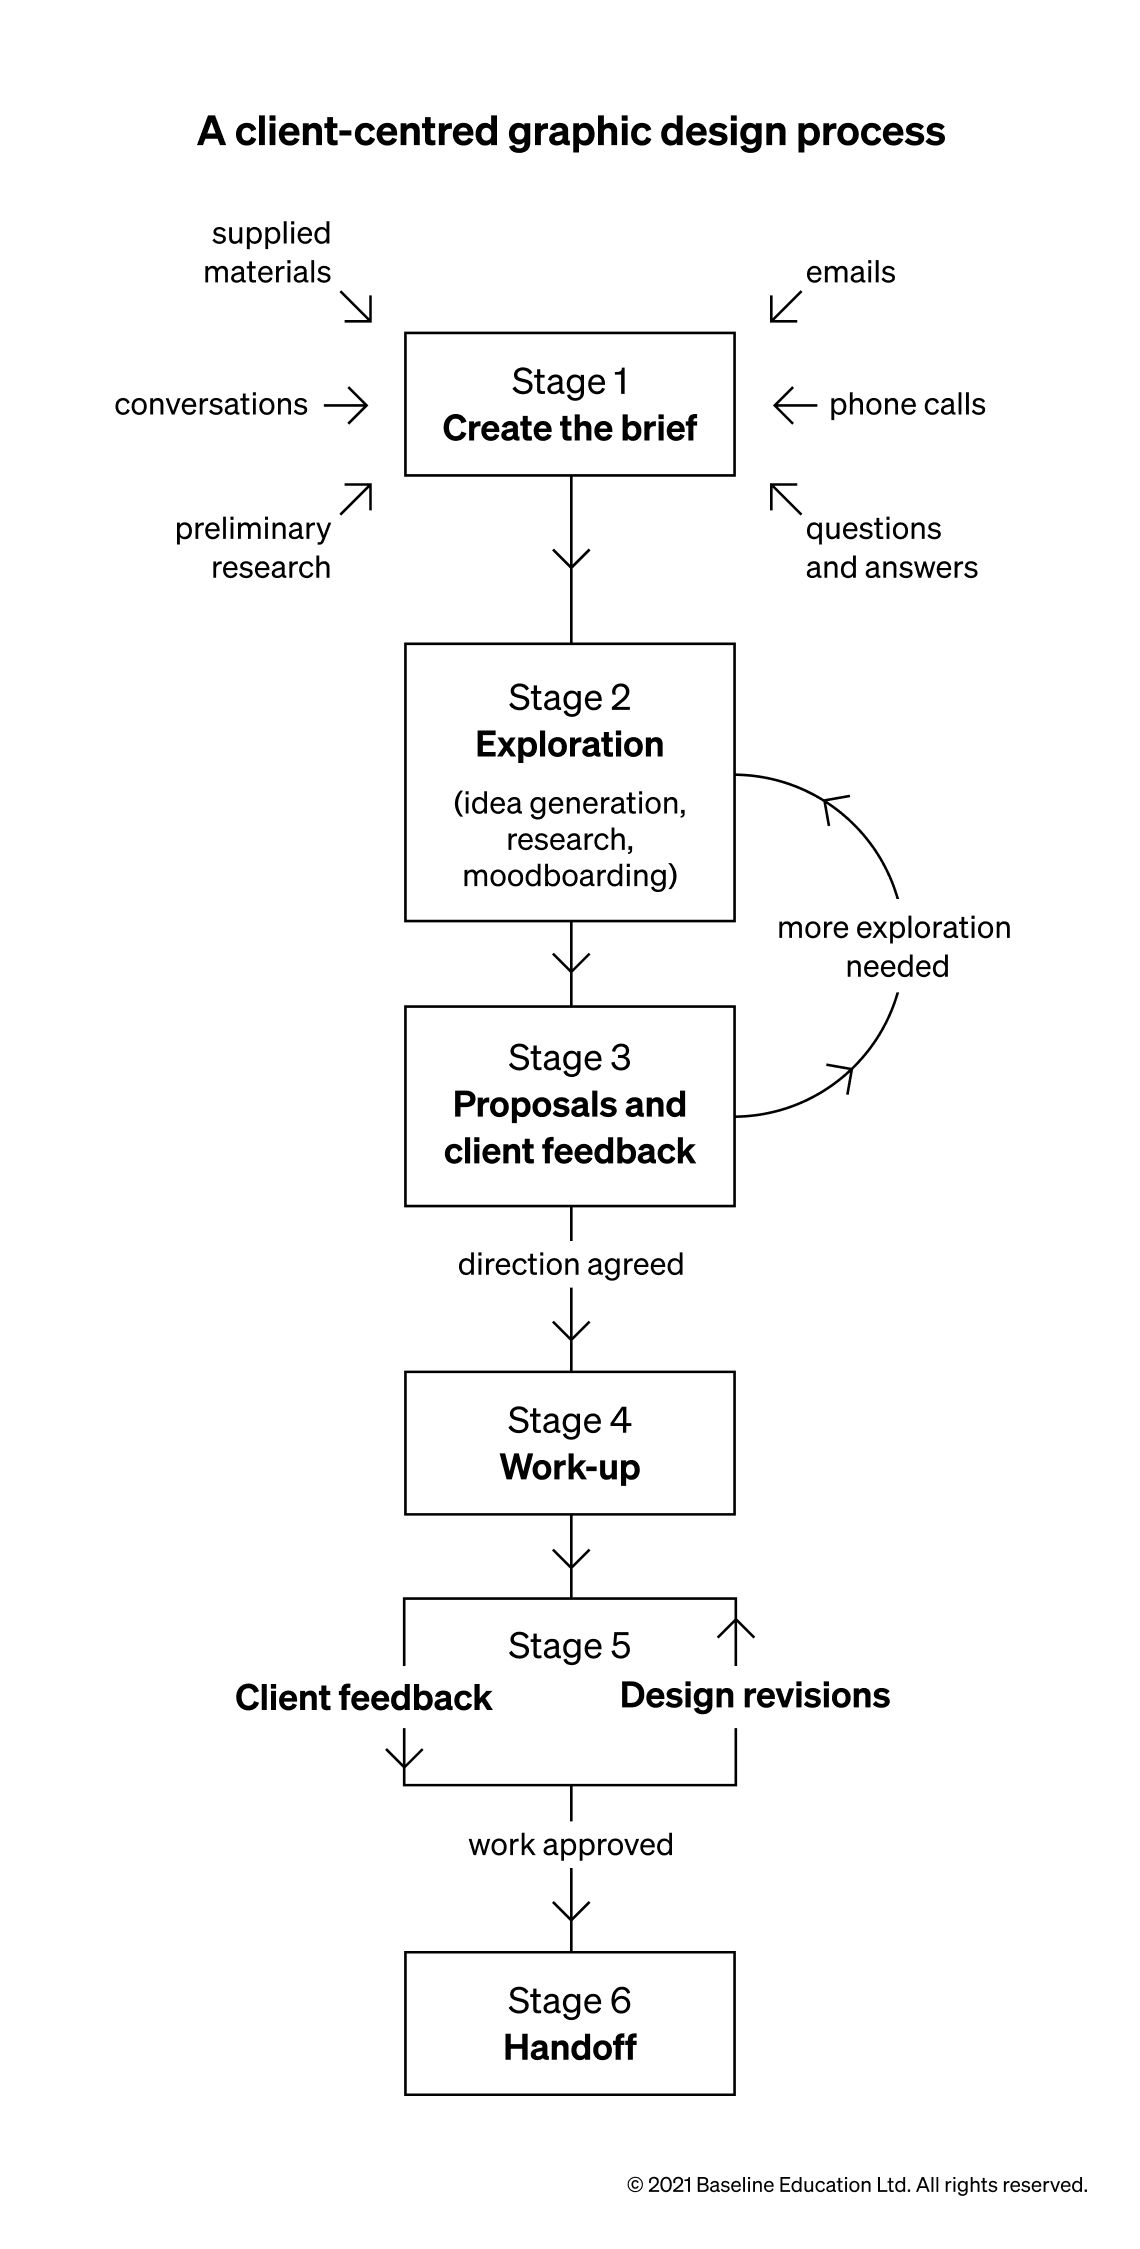
Stage 1: Create the brief

Image credit: Vadyn Pastukh/Shutterstock
A graphic design brief is a document that contains a summary of the project requirements, as well as relevant background, and other important information like deadlines.
Getting the brief right is arguably the most important step in the entire graphic design process. Because if you get it wrong, you might end up solving the wrong problem, missing an essential constraint on the project, overshooting a deadline, or losing the trust of the client.
Investing extra hours in getting the brief right will usually save you time overall, because you’ll avoid backtracking on details, or reworking ideas that you could have got right first time around.
Clients will sometimes come to you with a “ready-to-go” brief. More often, though, they’ll come to you with an email or phone call that offers a broad statement of the project and their needs.
Whatever you’re approached with initially, it’s important that you stick to your own process. If the client has given you their own brief, thank them for providing a great starting point, but explain that you have some follow-up questions to make sure you’ve understood everything correctly.
The best way to approach this is with an open-ended conversation initially, so that you can grasp in a general way what the client is asking for. This will allow you to build a fuller picture of how they understand the problem.
A really strong briefing process is capable of identifying whether the problem that the client has approached you about is really the one that needs solving.
For example, a businessperson might know their ads are performing badly, and ask you to work on some new designs that makes their web address more prominent. However, one high-quality conversation about the brief might allow you both to see that it’s the messaging that needs redesigning, not the font size.
Here’s the kind of information that often goes into a detailed graphic design brief:
Client details
- Client name: the individual or business commissioning the work.
- Contact person name and contact details: this might be the client themselves, or an administrator or project manager.
- Person responsible for final approval: this might be the client themselves, or it might be their manager, a divisional director, or a company executive.
- Other stakeholders: anyone else who needs to be kept informed about the project.
- Background: an introduction to the business, what it does, and what it stands for.
Project details
- Project summary: what the project is, why it’s being undertaken, and why it’s happening now.
- Project outcomes: what the project hopes to achieve, and what success means, particularly in terms of business goals.
- Demographic: who the audience or customer base is for the project or business
- Required deliverables: what designs, files, documentation, and other materials are expected to be handed off at the end of the project.
- Design direction: any ingredients that the client wants to see in the final work, anything they want to avoid, and any other points of reference they have in mind.
- Timeline: not just the final deadline, but also the timing of interim steps, including how much time the client will need to look at drafts and provide feedback.
- Overall budget: cost ceiling for the work, including budget for any project design overheads, like stock images and font licensing. Some clients will share their budget more willingly than others — it’s worth explaining that having this information will allow you to produce more relevant proposals
Reference materials
- Brand guidelines: if available, existing brand documentation, including mission statement, brand keywords, logo, colour palettes, typographic guidelines, etc.
- Customer personas or user personas: if available, short profiles of the kind of person who buys the client’s products or uses their services.
Stage 2. Exploration

Image credit: Pixabay
Once both you and the client are happy with the brief, it’s time to begin the exploration stage. This is also often called the “discovery” stage.
This usually consists of a range of activities including research, idea generation, and moodbarding.
Research
It’s important not to just move straight to solutions from the brief. The best way to avoid this is to commit to analysing and researching the brief as a first step.
There are many potential avenues for research:
- Analyse the brief. Read and re-read the brief you put together, note down any new questions that come up now that you revisit it; go back to the client with those questions if necessary, and update the brief; highlight key words, phrases, and constraints
- Get to know the client. Research their mission, what they stand for, their history, previous work, and current projects.
- Understanding the broader project, if applicable. How does the design brief you’re working on fit in to other parts of the bigger project, or with other projects the client has underway or planned for the future?
- Research the competition. Who are the client’s competitors? What do they do? How are they similar, and how are they different? What visual styles do they use? What are their strengths and weaknesses?
- Examine the problem. What kind of problem is this? Who has faced a similar problem? How did they solve it? What were the strengths and weaknesses of their solution? Have I solved a problem like this before? What can I learn from that?
- Analyse your own knowledge and skills. What might I need to know in order to succeed in this project? What avenues are available for me to learn any additional skills? Who might I need to collaborate with or contract out to?
Idea generation
To an extent, coming up with ideas should be a messy and chaotic process. Be guided by the problem you’re working on, and by the research you completed. But within those constraints, go as broad as you can with your ideas.
It’s sometimes said that there are “no bad ideas”. That, of course, is nonsense. There are lots of bad ideas. In fact, most ideas are bad. But when you’re in the idea generation stage, it’s also essential to generate those bad ideas and capture them.
Allowing yourself to generate a lot of bad ideas has the following benefits:
- it reduces your inhibitions and allows you to start putting ideas to paper more quickly
- bad ideas can lead to better ideas, better ideas can lead to good ideas, and good ideas can lead to great ideas
- capturing the bad ideas can allow you to move past them
- sometimes what you initially assume is a bad idea turns out to be not such a bad idea after all
There are hundreds of techniques you can use for idea generation. Here are a few that will give you somewhere to start.
- Deep thinking about the design problem.
- Word association. Take the key words and phrases from the brief, and write down other words you associate with them. Write down synonyms and antonyms. Try doing a 5-second drawing of each word.
- Mind-mapping. Begin with the key ideas from the brief, and generate connected ideas.
- Thumbnail sketching. Say that you’ve been given some text for a poster. Draw out a large number of thumbnail boxes, and fill each one with a different layout or graphic idea — just like the thumbnails you completed earlier in the course.
- Use the SCAMPER technique. This method helps you make each idea go further. Take any graphic or conceptual idea, and try these steps:
❯ Substitute
❯ Combine
❯ Adapt
❯ Modify
❯ Put to another use
❯ Eliminate
❯ Reverse
Moodboarding
Moodboarding is about collecting together visual reference points for a particular idea. For example, if the keywords for a book cover design are “techy” and “youthful”, you could search for images that reflect those ideas.
As your idea generation develops and you discover deeper or more abstract ideas, you can build mooboards around those too. For example, you might move on to more abstract keywords like “fragmented” and “occluded” which could lead to moodboards with interesting visual connections to those more abstract, conceptual terms.
The exploration stage can never be “complete”, as there are always more ideas available. However, for most projects, the goal is to develop two or three viable concepts, within the time available, that can be turned into proposals for design solutions.
Stage 3. Proposals and client feedback

Image credit: RF._.studio
The next step is to put together two or three proposals for design solutions that meet the brief. For example, if you’re working on a design for a book cover, you might present the following:
- Sketches of two or three distinct directions for the book cover
- Moodboards for each one
- Explanations of the idea and reasoning behind each proposal
At this stage, it is usually a good idea to get client feedback. Present them with the 2 or 3 directions that you’ve developed up to this point, ideally with a rough sketch or mockup of what kind of solution each one would lead to for the project.
Getting feedback at this point allows you to go back to the drawing board if necessary, without having invested a lot of detailed work that can’t be used. If they like one or more of the directions, and have comments and ideas about how it could move forward, you also have the opportunity to hear those and factor them in to your next steps.
It also means the client can feel (and be) a partner in how the work is developing, maintaining goodwill and likely making the handoff process easier at the end of the project.
Once you’re at the point of agreeing which direction to move forward with, you can move on to the more detailed development work.
Stage 4. Work-up
Image credit: Tranmautritam
Once you’ve agreed a design direction with the client, the next stage is to develop it. For example, if you presented sketches or rough digital versions of a book cover design in the previous stage, now is the time to develop the final, detailed design.
Stage 5. Client feedback and design revisions

Image credit: Startup Photos
Once you’ve done some work-up, it’s time to go back to the client for their feedback, and make any necessary changes. The number of review cycles needed, and the number of revisions required, will vary from project to project.
Stage 6. Handoff

Image credit: Taneli Lahtinen
Once the client has signed off on the final version of the design, you can move to handoff. This means finalising all of the deliverables, and supplying them to the client.
In conclusion...
It’s no accident that the majority of the word count in this assignment was devoted to stages 1 and 2 of the graphic design process. Time invested during the briefing and exploration stages will make all the subsequent work more focused and efficient.
With some process basics covered, let’s move on to the fun stuff — starting in the next assignment with fonts!